Showing posts with label Smooch Spritz. Show all posts

Sunday, February 10, 2013

Walking with Catitude * Donna Salazar Designs* & Video Tutorial on Background Stamping

OK, I think I am getting over my week, having a day just creating yesterday helped a lot! Will share more of that when I photograph the projects. It has been a nice change of pace for the weekend. I am feeling a lot better now! Thank you everyone for your beautiful words of advice and support! Really does mean a lot! So Thank you from the bottom of my heart!

On some other news I have just announced I will be having my first weekend workshop in Mackay on the 16th & 17th of March. I have just put a call out for expressions of interest, also if any one knows of any good venue's I should look into I would really appreciate it!


I am re-posting this project that was recently published in Scrapbook Creations Magazine

No.97


Welcome back, Today I have another video tutorial on creating your own background with Donna Salazar's stamps & Mix'd Media Inx & Smooch Sptitz. I have also used the Spellbinders Bitty Blossoms  on this layout! They are so gorgeous and perfect for creating flowers to suit any project.


 To give your bling butterflies more movement stick them to a piece of acetate, then cut it out and glue the center of the butterfly down with the wings slightly bent up.
 After cutting the leaves from the bitty blossoms, ink with Mossy Mix'd Media Inks then mist with water and crumple up to give the leaves more texture.


Here is the Video Tutorial on creating the patchwork stamped background!


Materials:


Clearsnap
SpellbindersBitty Blossoms

Other Products:
String
Clear Embossing Powder

Butterfly charm
Jenni Bowlin - Reverse Navy Stickers
Websters Pages - Little storytellers Colour Holiday
Plain Copy Paper to make a mask

Adhesives
Helmar Tiger Grip 

Tools

Heat Gun


Thanks for dropping by!
Have a great day!
Cheers
Michelle xx

Friday, January 4, 2013

Freedom ~ Jan ATC & Tutorial ~ Dusty Attic

Welcome to my first Dusty post for 2013. The theme for this months ATC Challenge is Fairies & Flutterbies. These butterflies will soon be available in the next new release.


Flying Chipboard Butterflies - Tutorial

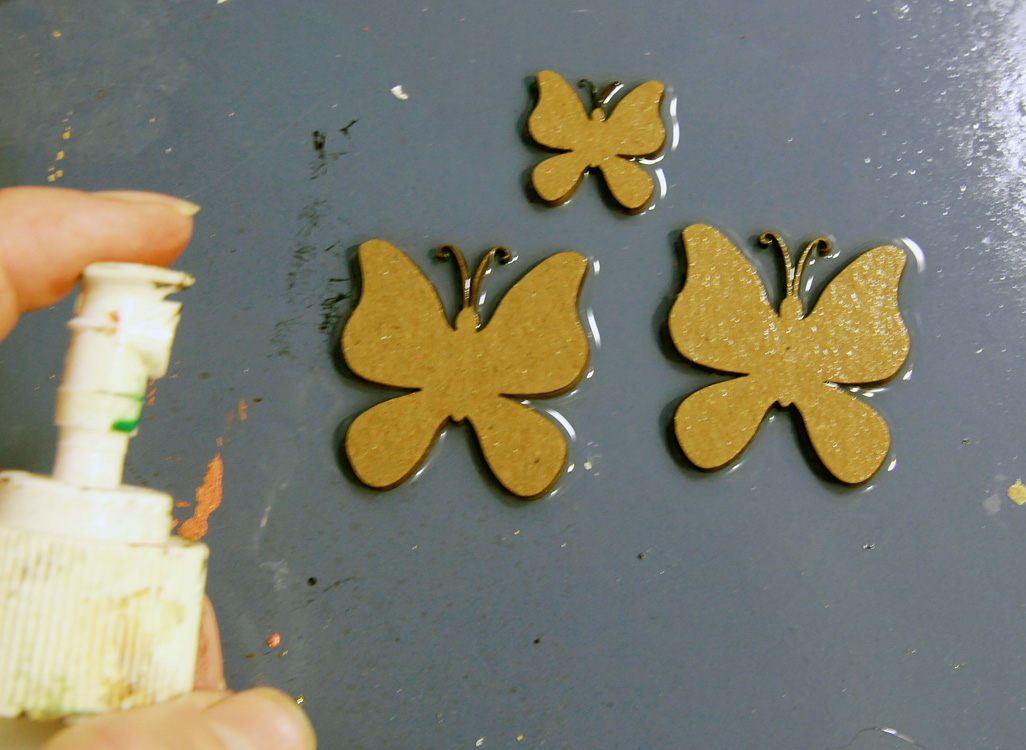
I wanted to create some butterflies with the appearance that they were flying.
This is an easy technique to create movement in your chipboard butterflies.
I have used the new Butterflies #3 that are coming out in the next release.

Step 1: I have used 2 medium and one of the small butterflies.

Step 2: Soak the butterflies in water and separate into 3 layers so 3 butterflies then become 9

Step 3: While the chipboard is still wet curl up the edges of the butterflies, then dry with a heat gun. The heat gun will help the edges curl a little more too.
Step 4: Once dry I have coloured them with Smooch Spritz - Citrus Tickle, then painted the edges of the butterflies with white paint.

Step 5: Use two layers of the butterflies for the medium butterflies. To create the body take a piece of craft wire and add some beads.
Step 6: Then fold the wire around the butterfly going between the antlers and around the back.

Step 7:
To Make the small butterflies I have used each separate layer individually and gently poked the wire through  the middle of the chipboard. Add some PVA glue as you do this to hold it in place.

Materials:

Dusty Attic Chipboard
ATC Chipboard Frame DA0663
Butterflies #3 DA0842

Dusty In Bloom
Mini Roses (Coming Soon)

Other:
Clearsnap - Smooch Spritz - Citrus Tickle, Splash & Ice Rink
Gauze
Wire
Beads


Thanks for Dropping By!
I hope you all have a fabulous year and that all your dreams come true! x

Hugs Michelle xx

Wednesday, December 5, 2012

Believe, Create, Inspire Canvas - Donna Salazar & Dusty Attic

This canvas combines two of my Faves, Donna Salazar Designs & Dusty Attic!
I had fun creating this canvas, it was nice to just experiment and play, I am soo happy with the results too!! I have more of Mistra's Flowers made from the Donna Salazar Rose Creations Die.
You can see Mistra's tutorial on how to make these flowers here: Wild Rose Tutorial. They are sooo yummy! I also have some of the new Dusty releases on here too! I love anything that is nature and earthy, these pieces were right up my alley!
I also have another new love on here and that is modelling paste and stenciling. I love this damask stencil, it is the Damask Stencil by My Art-C.
The New Dusty Gum Leaves and Birds a field were perfect for this piece! I love the new mini Chicken Wire too!!
You can see how yummy the damask stencil is here, I love the effect you get when you spray the smooch spritz over them too!
I love Mistra's flowers! They really are divine!

Materials:

Clearsnap
Spellbinders - Rose Creations

GCD Studios
Botanique Collection 

Dusty Attic

Birds a field DA0749
Gum Leave (New Release 2013)

 Paints - Oceania DA0912 (Coming Soon)

Other Products:
Modelling Paste
My Art-C - Damask template
Collections Tissue Paper
Lace & String
Rusty Hinge
23x34cm canvas


Adhesives
Helmar Tiger Grip 
Double Sided Tape


Thanks for dropping by!
Have a great day!
Cheers
Michelle xx

Sunday, November 25, 2012

Posers ~ Donna Salazar & Dusty Attic

Hi I am back again, today I am sharing this layout that I created at the Hyden Retreat in WA.
I think I was channeling my friend Debbie in the picture here as this layout reminds me of her style too. We had a table challenge at the retreat to use the dusty decorative frame #1.
I was also spoilt by Mistra who gave me a bunch of her ready made Donna Salazar Flowers made from the rose creation die! They are just sooo yummy, she is such a clever chickie!
The Sprightly Sprockets white coordinates fit perfectly over the decorative frame. I have also used the Family Portrait - Botanique paper here.
 The circle design was created with an Orchid (The Crafters Workshop) Template. The center was inked with the Black Mix'd Media Inx. The blue Sea Kiss Smooch Spritz was wiped on with a baby wipe then I have used a card to wipe a thin layer of modelling paste over this to soften the whole effect. The blue dots around the border were created by sewing french knots on each dot.


Materials:

Clearsnap
Spellbinders - Rose Creations

Other Products:
Embroidery Thread
Modelling Paste

Prima Bling
Basic Grey Alphas
Kaisercraft Rub Ons

Cardstock
Martha Stewart Punches
Doilies
The Crafters Workshop Template - Orchid


Dusty Attic

Decorative Frame #1 - DA0207


Adhesives
Helmar Tiger Grip 
Double Sided Tape


Thanks for dropping by!
Have a great day!
Cheers
Michelle xx

Friday, November 23, 2012

Family ~ Dusty Attic

 This layout makes me smile. It is lovely to capture a rare hug between brother & sister.
These two are growing up soo fast. So proud of both of them! This photo was taken at Wil's yr12 formal. I can't believe he has finished school already!


 Materials:

Dusty Attic
Hanging Sign #2 DA0701
mini Birds #1 DA0723
Bird Nests #2 DA0721


Thanks for dropping by!
Have a great day!
Hugs
Michelle x

Friday, November 16, 2012

Handmade Holidays Blog Hop ~ Day 1


Welcome to the 2nd Annual Handmade Holidays Blog Hop!!!


Calling all crafters! We’ve gathered designers from some of our favorite manufacturers to show you ways to create something from the heart this holiday season. This 3 day Hop (Nov. 16-Nov.18) includes over 60 stops with inspiration brimming from every corner. Explore all of the thoughtful and frugal handmade gifts you could create for the holidays, all in one place, during our second annual Handmade Holidays Blog Hop!

To sweeten the Hop, we’re offering a gift for you! For every comment you leave on the blogs in the Hop, you’ll be entered to win a prize pack from one of the participating manufacturer sponsors! Use the Rafflecopter widget on the Clearsnap blog to gain extra entries each day: http://cleasnap.blogspot.com


Visit the list of blogs below and leave a comment on each by Nov 27, 2012 at 11:59 PM PST. Each day of the hop we will be sharing a brand new list of blogs with brand new projects for you to explore, be inspired by, and create from!

Donna Salazar Designs – http://donnasalazar.typepad.com/
Eileen Hull for Sizzix http://eileenhull.blogspot.com/
Kristin Wilson – Graphic 45 -  http://www.kristinwilsonhandmade.com/
Jennie Garcia - Tombow -  earthyscrap.blogspot.com
Gini Williams Cagle - Hampton Art - http://ginicagle.blogspot.com/
Sabrina Alery – Clearsnap – http://Sabrinaalery.blogspot.com
Michelle Grant – Donna Salazar Designs -  http://michellejbg.blogspot.com
Emily Lanham – Authentique Paper -http://www.createserendipity.net
Steph Ackerman – Globecraft Memories - www.stephaniescraps.blogspot.com
Emma Jeffery – Fiskateers - http://hellobeautifulblog.blogspot.com
Natalie Clause – The Twinery - 
Alberto L Juarez – Graphic 45 http://vintageodyssey.blogspot.com/
Jennifer Priest – Clearsnap – http://hydrangeahippo.blogspot.com
Heather Conklin – Authentique Paper - http://goldiecar.blogspot.com/


I have created this 7x7  Gift Canvas using the Clearsnap Smooch Spritz Sprays,
Modelling Paste & a Chipboard flourish.
The Smooch Sprtiz Sprays are my favourite inks for using on canvas's the colours are so rich and are just gorgeous!
 1. To create this canvas start by giving your canvas a thin coat of the modelling paste, I Created the texture lines in the paste with a tool I have created like a credit card. Allow this layer to dry a little before doing the flourish.
2. The Modelling paste flourish was created by placing the chipboard piece on your canvas then coat over the chipboard with the modelling paste then scraping the excess off the top . Then lift the chipboard flourish straight up and out of the way then you can use a spatula to blend in around the edges. Leave this to dry overnight.
3. Next use your smooch spritz to spray over your canvas. Over lap colours until you are happy with the effect and spritz with water to help blend and lighten colours.
I have used a mix of Caramel Latte, Candle Glow, Mossy Mist, Green Olive & Citris Tickle
When you spay each colour experiment by letting it run one way then the other over the canvas  and spritzing with water for different effects!
4. Once you are happy with your colours I have added a little gold Rub & Buff over the ridges to highlight the texture.
5. This was then decorated with trinkets and found items along with some graphic 45 tags and Dusty Attic Doily Chipboard. Use 3D foam tape to add more dimension when you are creating depth on your projects.


I hope you have enjoyed this project! :)

Cheers to creating gifts from the heart this holiday season!

Happy Hopping!


Thanks for dropping by!
Have a great day!
Cheers
Michelle xx

Sunday, September 23, 2012

Hear you with ~ Donna Salazar Designs ~ DT Swap ~ Donna

Hellooooo, How is everyone today?? I this post finds you all well. I am back again with another DT Swap layout, this month I had to do Donna's photo. This was such a fun photo to scrap! I hope you like it Donna!


 Lots of stitching on this one, I have even machine stitched over the chipboard  letters.
The drips in the background were created by mixing embossing powder with the Mix'd Media Re-Inkers then adding dots of the mixture to the top of the page. Then hold the page up vertically and water spritz over these to create drippage. Once you are happy with the drips you can then heat set the remaining embossing powder. It gives it a nice grainy look like sand particles.


I hope you like it Donna!
Cheers Michelle x

Materials:

Clearsnap
Other Products:
Denim
Fabric
Ribbon
Buttons
Basic Grey Micro mono stickers


Adhesives
Helmar Tiger Grip 

Tools

Heat Gun


Thanks for dropping by!
Have a great day!
Cheers
Michelle xx

Monday, July 16, 2012

Another Beautiful Sunset

Here is another Layout for Dusty Attic. This month I have used the new Telegraph Poles from the Dusty Attic May Release. I love these!!!
I captured this sunset last month, it was simply stunning with the colours changing every minute.


 Materials:

Dusty Attic
Old Telegraph Poles - DA0707
Grass Border #1 -  DA0659
Dusty in Bloom - Celestial White

Other
Smooch Spritz - Caramel Latte
7 Dots Studio - Dreamer Collection
Pink Paislee - Mistables
Masking Tape
7 Gypsys Tape
Modelling paste
Water Colour Pencils

Thanks for dropping by!
Have a great day!
Hugs
Michelle x

Related Posts Plugin for WordPress, Blogger...