Showing posts with label Michelle Grant. Show all posts

Saturday, August 3, 2013

30 Days of Blog Lovin ~ Day #27

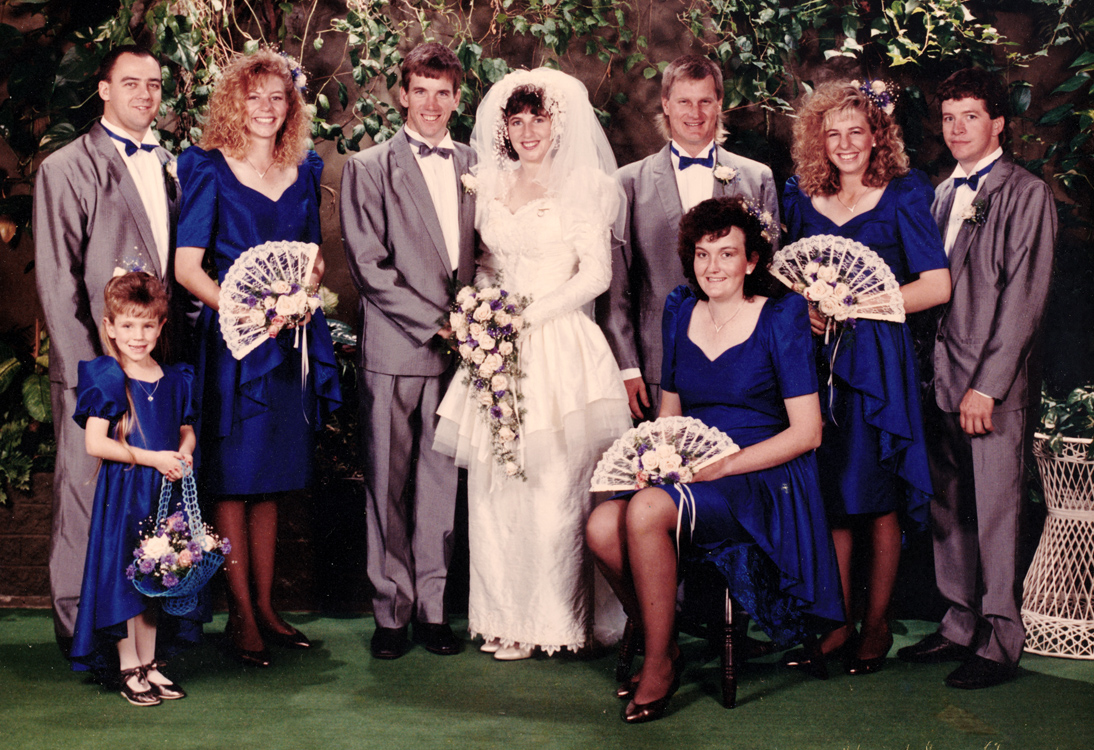
Day 27 - I have surprised myself with keeping up this 30 days of blogging, It has been a huge challenge.  Today is our 22nd Wedding Anniversary, I can't believe how fast the last 22 years have flown by. I am so blessed to have this man in my life. Has has been my constant support for over 2 decades. I always wanted what my Grandparents had and I know I have found it in Don!

3rd August 1991 - Mackay QLD
 
Over 2 decades and  2 children of many happy memories

Oh how the fashions change!
L - R Shane Shepherd, Carolyn Grant (nee Burns), Don Grant, Michelle Grant (nee Burns) Rick Kanns, Maria Smith (nee Prince), Susie Burns, Andrew Grant 


 And yes my sister did end up with Don's brother! That's keeping it in the family hey!

Anyway, you might be wondering what we did for our wedding anniversary today? Well sadly Don is out at work and Wil is away on a boys weekend away and I am home alone! 
I have missed not having Don here for our anniversary but have loved having a day to myself and a little bit of me time! It was just what the doctor ordered! I have had a lovely day doing very little today. I have mostly just been playing with Maddie and trying to teach her some new tricks.

I can't believe the 30 days is coming to an end. I am not sure if have really achieved what I set out to when I started this, I do know that I am worrying less about what I am writing about and just writing. I have let go of everything having to be just perfect. It is always the way hey, while you are waiting for perfection it just doesn't happen, because perfect is too bloody hard to attain! So I am still working on letting go of that perfection, I am getting there.... baby steps! Think it might be good to go back and read over the last 30 days myself now too!

Anyway, Night All xx


Wednesday, March 27, 2013

"Beautiful Eyes" ~ Donna Salazar & Dimensional Border Tutorial

Howdy I am back again this time with another layout of my gorgeous girl! I miss her so much since she moved to Brisbane. She is growing up into a beautiful young lady! I can't believe she will be 20 next month!


I have a tutorial below on how to create this textured frame.


This flower was created using Botanique papers and the Grand Peony Creations


 Dimensional Border Tutorial
 It is pretty easy to create this dimensional border. All you need is a peace of patterned paper. Using your craft knife and cut a cross though the middle of the paper. Only cut up to a couple of inches in form the corners. If you have a pattern on the corners like this paper, blade around the pattern so it stays flat.

 Next spray water all over the paper, make it wet enough so that it is easy enough to manipulate.
 Then starting at the center of the paper, concertina, crumple and fold the paper back onto itself.
 Once you are happy with the folded borders use your craft knife to poke a hole into the center of the border and hold it together with a brad. Then Wallah a quick and easy dimensional border!


Paper:
GCD Studios: Donna Salazar Designs - Fun & Funky
GCD Studios: Donna Salazar Designs - Natural Beauty
GCD Studios: Donna Salazar Designs - Family Jeans
GCD Studios: Donna Salazar Designs - Botanique
GCD Studios: Donna Salazar Designs - Crafty Chronicles
Stamps:
Art Gone Wild: Donna Salazar Designs - All my Love
Ink:
Clearsnap: Mix’d Media Inx - Chiffon
Dies:
Spellbinders: Grand Peony Creations
Embellies:
Want 2 Scrap: Donna Salazar Designs - Sprightly sprockets black
Want 2 Scrap: Donna Salazar Designs - Corrugated Hand Drawn Swirls
Other:
GCD Studios: Donna Salazar Designs - Natural Beauty Alphas
Clearsnap: Smooch Spritz - Vanilla Shimmer
Beads

I hope you have enjoyed this tutorial!!
Have a Great Day! xx


Saturday, March 16, 2013

Weekend Workshop 23/24 March Update


I am excited to announce the first weekend work shop will be going ahead on the

23rd & 24th of March 2013
Saturday 23rd - 9.00am to Late
Sunday - 10am to 5pm

Venue: Mackay Art Societies, Snow Wright Court, Beaconsfield 4740


View Larger Map


This is going to be a fun filled weekend full of creative inspiration.

___________________________


Included in this Weekend Workshop:

  •  2x ScrapMedia Workshops with all kits supplied
Sneak peek of Saturdays  Workshop,
Will be learning paint blending techniques working with the New Dusty Attic Paints
(Included in the kits)


Sneak peek of Sundays Workshop,
Using Donna Salazar's Mix'd Media Inx (Included in the kits)
  • All meals Included - Morning, Afternoon Tea and Lunch for both Saturday and Sunday as well as Dinner and Supper for Saturday Night
  • Mixed Media Canvas Demonstration
    (There will be canvas's available to buy if you want to play along with us, or bring one with you)
  • Challenges and Prizes
and more!


Don't Miss the Chance to catch up with old and new friends for a fun filled weekend.
Numbers are limited so don't forget to book in early to avoid disappointment.

There are still a few places available for the whole weekend and for the the one day options.
Email or call if you have any questions or if we can help you! :)
______________________________

***Also Coming to the Weekend Workshop***

I am excited to Announce for your shopping pleasure

***Barbie's Scrapbooking Magic***

Barbie will have her shop set up at the weekend workshop on Saturday from 9am to 3pm.
I am sure you will be able to find something you are looking for between us.
It will be a great opportunity to stock up on adhesives and browse all the new yummy goodies we will have available for you.
Both shops will be open to the public from 1pm to 3pm on Saturday
If you can't make the weekend workshop, we would love for you to drop in and say Hi!


Weekend Workshop Payment Options:

*** Please Note Due Dates have been Extended***
23 & 24th of March

When you click on the Buy Now button this will take you to PayPal.
You have 2 options of paying on the PayPal page
1- Pay with PayPal Account 
2- Pay with debit or credit card (you do not need a PayPal account to make one off payments)


Option A
Full Weekend Workshop ~ Early Bird Special
$205.00 if paid by the 18th of March

Option B

Full Weekend Workshop ~ Full Payment
$242.00 if paid after the 18th of March
Full Payment Due by the 20th of March

Option C

Full Weekend Workshop ~ Payment Plan
2 x Installments of $121.00
Due by the 20th of March


Option D
Weekend Workshop ~ Saturday Only
$147.00 - Saturday 9am to Late
D
ue by the 20th of March


Option E
Weekend Workshop ~ Sunday Only
$95.00 - Sunday 10am to 5pm
D
ue by the 20th of March


or

Pay by Direct Deposit to

Studio M  Designs – NAB
BSB: 084-789
Acct No: 15-305-7091


(Please Include your name in the details when paying by Direct Deposit.)


_______________________________________________

Weekend Workshop 23/24 March Itinerary


Weekend Workshop 23/24 March Registration Form


These forms are PDF forms,
(
these forms still have the old due dates on them, please refer to the amended dates above)

You can print out the registration form, fill in and scan to email back

or just email your registration details to michelle@studiomdesigns.com.au


_______________________________________________

To keep up with all the latest news and announcements make sure you sign up for the newsletter below to be the first to hear all the latest news!


If you have any questions about this fabulous weekend
Phone:
Michelle on 0428857022  or
Email: michelle@michellegrantdesigns.com


Looking Forward to seeing you there xx

Wednesday, March 13, 2013

Beautiful ~ Donna Salazar & Tutorial - Butterfly Pizazz

Hello again, I bring you this post from a very very wet Queensland in Aus! It has been raining for weeks we have finally had a couple of days of sunshine!
I have a very clean lined layout for you today! This style of layout is a huge challenge for me, but I really wanted the photo to speak for itself on this layout!
Donna's papers and embellishments were perfect to compliment this photo. This photo is taken at my Grandparents beach. This is my favourite place in the world. And now that my Grandparents are gone it is even more special to me! I miss them so very much!


I have added a little pizazz to this butterfly, you can see the tutorial below to get this effect.


 Butterfly Pizazz Tutorial

This is a really simply and effective way to add a little pizazz to your butterflies or embellishments!


All I have done to achieve this effect is stamp with the Swirly Doos Stamp and the Butternut CHOX Mix'd Media Inx. Stamp the swirl over each wing. I used a scrap of paper to cover each wing while I stamped the other.


 Next take the Glue Gloss and paint inbetween the stamped pattern then sprinkle with Fairy Dust Glitter.
To finish of the butterfly I have used beads and wire to create the body and antennas, I sprayed some gauze with black ink to create the tail for the butterfly..


Paper:
GCD Studios: Donna Salazar Designs - Fun & Funky
GCD Studios: Donna Salazar Designs - Natural Beauty
GCD Studios: Donna Salazar Designs - Mix'd Media Stax
Stamps:
Art Gone Wild: Donna Salazar Designs - Swirly Doos
Art Gone Wild: Donna Salazar Designs - All My Love
Ink:
Clearsnap: Mix’d Media Inx Chox - Butternut
Clearsnap: Mix’d Media Inx - Black
Dies:
Spellbinders: Bitty Blossoms
Spellbinders: Shadow Flowers
Spellbinders: Pockets & Swirls
Other:Clearsnap: Fairydust Glitter
Clearsnap: Glue Gloss
Beads
Gauze


 I hope you have enjoyed this quick and easy tutorial!
Have a great day!
Cheers!


Sunday, March 3, 2013

Let your light Shine the way! ~ Dusty Attic ~ Tutorial

Welcome back, today I have a project to share with you for Dusty Attic using the new release dusty Moroccan Lamps and French Border. This canvas has a lot of dimension on it! And in creating this dimension on the intricate pieces I worked out an easier way of creating varying depths to your pieces. See the tutorial below for this simple and effective technique.


Even though this looks like a shadow box it is just a normal canvas with a chipboard border.
 

Dusty Attic: French Garden Border - DA0845
Moroccan Lamps - DA0835
Dusty in Colour:
Capri - DA0915
Oceania - DA0912
Navajo White - DA0903


Dimensional Lamp Tutorial

For this tutorial I have used the Dusty in Colour Paints, a gold sharpie pen. A sponge for painting. Then to add the dimension you just need some strips of chipboard off cuts and some tiger grip glue or something similar.


To get the painted effect on the lamps I first painted the lamp with the Capri paint. Then using the Gold Sharpie (Love these metallic sharpies I got them in a pack with gold, silver and a bronze.)
fill in the lines on the lamp.


To soften the look I have sponged some of the Oceania paint over the lamps and very lightly over the gold pen lines.

To add even more dimension I have used my finger to add some white paint highlights over the lamps.


Now the secret to getting great dimension of varying heights is to use chipboard strips. you can even used the offcuts from the pieces the chipboard comes in. Just cut them into strips to what ever height you want to raise your pieces. To get this effect before I would add layers of foam tape. But not only are the chipboard strips easier to hide behind intricate pieces you can cut them, to what ever height you like. Add the strips to your chip pieces using a strong glue then glue the chip pieces to your work. So happy with how effective this is!


I painted the chipboard with brown paint before cutting it into strips. You can paint the chipboard to to match the background of your page so that it is less noticeable behind your chip pieces. You can also bend the chipboard into curves if needed too!

I have used narrow chipboard strips to create the border around this canvas. I then added the french border to the top of the chipboard frame to give it more of a box look.


I hope you enjoy this tutorial!!


Saturday, February 23, 2013

Drowning in Social Media

Do you ever feel like that?? I am feeling like that alot lately.
Gone are the days when you could just start a business and buy some stock and do some advertising to start selling a service or product.
I am learning very quickly that a lot has changed in the last 10 years when it come to running a business in this day and age. The importance placed on Social Media is huge, and you need this one to connect to that one and so on. I have been learning about so many new media formats and have started countless new log ins and passwords. Some days I feel like I am drowning in it!
Keeping up with an online presence is a full time job on its own. I know I will get more efficient at managing my social media marketing but man there is a lot to take in!


I am determined to win the battle over social media and find that happy medium! 
I still have to do all the social media buttons for my blog yet! Another job still on the list!
How many is too many? What do we really need?
In the last 3 months I have set up Twitter (Although I have no idea how to use this yet), Instagram (Another one I haven't used yet), Mailchimp - Newsletter (has taken me all day to get my head around this one, Facebook Business Page, Etsy (hopefully I will be able to open my Etsy store very soon), Evernote, Skype, Pinterest (I have had this one for awhile and love it!), Paypal Business account, Linked in, You Tube and many more accounts with online selling avenues, Art Groups & Workshops and more!

I have also designed my New Blog Make over and Logos and all the little bits and pieces that go with it! All this to set up an online store, but it wont be just any online store I will have a few different ventures and avenues that will be happening. I started out just setting up an online store to sell online kits and classes but after doing Kelly Rae's Flying course I have also set up Michelle Grant desiGns and have so many other projects on the go too! I will also be doing weekend workshops here in Mackay with the first being on the 23rd & 24th of March. More details on this workshop coming soon.

I am still waiting on my online store Studio M desiGns to be built!
So it would be an understatement to say I have been a bit busy lately!
Keeping up with all the online community & DT commitments is going to take a bit of balancing for the next few months
But I know it will be all worth it in the end! I have had a lot of up and down days, and a lot of days where I think what the hell am I doing?? Then I just need to remind myself that I want to create financial freedom for my family so Don doesn't have to work away from home. I just need to keep telling myself it will be all worth it!!!
But boy oh boy has it been a steep learning curve!!

Sharing more of me is still a bit scary for me, but a huge thank you for all the support, you guys are helping me overcome this fear!! So thank you from the bottom of my heart!!

I have had the general mum thing worrying about my kids these past few weeks, both are facing changes in their lives, Wiliam is pursuing a career in the army, and Leonii is moving into a house from the unit they are in at the moment and is also changing jobs. It is so hard when she is 12 hours away and cant help. I just have to hope we have given them enough belief, drive and ambition to achieve their dreams and find a happy path in life. I have another post to do of my weekend with Leonii last weekend and the Paint Mojo Workshop we attended! I haven't had time to download the photos yet! Will put that on my list this weekend!

To end on a positive note we have a new internet provider for a quarter of the price, we were paying $320 for 50GB a month with Telstra and had crap service, now we can get 100GB for $59.95 and the service is way better and doesn't drop out for hours on end!
So So happy about that!! Our internet dilemma has caused me more than a few grey hairs!!
Looking forward to working without delays and maybe being able to get to bed a bit earlier too!!

Just came across this post by Trina McClune - Creativity Takes Courage tonight about Creativity Takes Courage! Oh so true, and pursuing a creative business takes even more!!! I want to learn to follow my dreams and make them a reality so I can help lead the way for others to follow theirs!

I took this photo the other afternoon, you can't really see it but it was lightly raining in front of the tree, with the sun shining in the background. It was really beautiful! I think I came up with this quote, but when you see so many I don't know if it truly original from me or if I was inspired by something somewhere.  


So I will leave you on that note! I am off to bed now! Night All x


Thursday, February 14, 2013

Happy To Be Me ~ Donna Salazar Designs ~ DT Swap

Howdy Hi, This is the last of my DT swap layouts done!
This one is going to Natasha, she wanted us to scrap a picture of ourselves!

I prefer to be behind the camera than in front of it. I think there are so many of us mums are like that. Its sad hey, because at the end of the day it is your kids that miss out if anything happens to you and they have so few photos of you to remember you by. It really hit home to me and made me very sad when I was looking for photos of my kids with me when they were babies. I hardly have any, lots of dad and the kids and Grandparents but hardly any of me if any.
So after that I try to suck it up and suck it in lol and will let someone take a photo of me now. As soon as you get past that initial EEK and you start relaxing and having fun even you can be surprised with the outcome! Don't be selfish for your kids sakes, it is they who miss out on you in the years to come. I still don't like a lot of my photos, but that is more about me not accepting me for who I am, so this is me and this is the imprint I am leaving imperfections and all! 
It also helps if you know how to use photoshop too!! Although this pic here is a selfie taken on my phone and is untouched other than a border and texture app.

 
 Love Donna's New Papers!!! The colours are awesome and so versatile! I can see these going with everything!!!

 I have used the new Driftwood Chox Mix'd Media Inx on this one! Love this colour too!


I hope you like this one Tash xxx


Products used:
Patterned Paper
GCD - Natural Beauty - Flying Free, Free, Twiggy
GCD - Family Jeans - Denim Dot
Crafty Chronicles
Mix'd Media Stax
Colour
Clearsnap Mix'd Media Inx Chox - Driftwood
Stamps
Donna Salazar - Chicken Wire
Dies
Spellbinders - Grand Peony Creations
Other
Alphas - GCD Fun & Funky Chipboard Alphas
Brads
Embroidery Thread
Lace.


Related Posts Plugin for WordPress, Blogger...