Showing posts with label Smooch. Show all posts

Thursday, January 24, 2013

Australian Scrapbook Ideas - Issue 18 - Tried & Tested Mix'd Media Inx "Leaning Tower of Pisa""

 Back again with the last layout from the Mix'd Media Inx article in Issue 18 in the Australian Scrapbook Ideas magazine.  Leonii took this photo of the Leaning Tower of Pisa on her holiday overseas last year!!! This one shows the use of mixing the Mix'd Media Inx with modelling paste then used over stencils!!

I went live with my facebook page tonight and I am blown away by the response already!!!
Thank you so much everyone from the bottom of my heart!!! :)
Michelle Grant desiGns Facebook


Tip:  Blend your Mix’d Media Inks with modelling paste to create different coloured modelling paste. You can use the ink pads or the re inkers for this technique.
Tip:  Mix’d media Inx Blend and run easier over the top of Modelling Paste or Gesso and is absorbed more on plain paper but can still be softened and blended into the paper when spritzed with water.


Materials
Grey Cardstock
Sunrise Country Garden Morning Bo Bunny Paper
Black, Mossy, Patina  & Jasmin Donna Salazar Mix’d Media Inx  & Re-Inkers Clearsnap
Dear Sir & Crackle Donna Salazar Art Gone Wild Stamp
Tape 7 Gypsies
Route 66 Glimmer Mist  Tattered Angels
Mont Marte Modelling Paste
Mini Cherry Blossoms, Mini Houndstooth Crafters Workshop Templates
Fiskers Template embossing stencil
Buddies Brads Lost & Found My Minds Eye
Leaves Green Tara
Grassy Knoll Dusty in Bloom
Mini Picket Fence Dusty Attic
Vanilla Ruffled Roses Petaloo
Jardine Printery Prima Flowers
Orchid Blossoms Kaisercraft

Tiles Prima
Grass (from the yard)
Biscotti Perfect Pearls Mist Ranger
Adhesives, Helmar Tiger Grip
Double Sided Tape
3D Foam Tape


Wednesday, September 26, 2012

Friends ~ Donna Salazar ~( 3 Tutorials in 1)

Hi again, good to see you back here! Against all odds I have this post ready for you today. And I mean all odds, it has been a long road to get this post happening. My new computer of 12 months crashed, so I got my old computer reformatted to use and it too crashed yesterday, it kept freezing and was super slow and  playing up which reminded me why I upgraded in the first place. Anyway it has been a trial as I am now using the laptop. But it hasn't been easy as the programs and printer are hooked up to the desktop. It's always the way when you have a heavy workload with umpteen deadlines looming! But I made it! Maybe with a few extra grey hairs but I am here! Phew! OK Back to normal programing, I am back with another Donna Salazar Design for you today with 3 tutorials for the price of one. 

This layout is on a group of Leonii's childhood friends from primary school. Its great that they keep in contact and and catch up when they can, even though they have left school.


Lots of yummy Donna products on this layout. Here is a tutorial on how I created the background:


 I have used the Kaisercraft TigerLily Butterflies and the Want2Scrap Butterfly Bling to create these cute little butterflies. Here is the Tutorial on how I created these:


Last but not least here is a tutorial on making Paper Towel Flowers. I love the colours you can get when you clean up your spray ink with a paper towel. The best part is that you always have flowers that match your project perfectly.


The Chipboard flourishes were inked with the black MMI and embossed with the Black & Indigo Embossing powders.


 Materials Used:

Clearsnap
Other Products:
Paper Towel
Tags, Doiley, Brads

Embroidery Thread

Friends Tag - Unknown.


Adhesives

Helmar Tiger Grip
3D Foam Tape
Double Sided Tape 

Tools

Heat Gun


Thanks for dropping by!
Have a great day!
Cheers
Michelle xx

Thursday, June 28, 2012

Bird Cage Reverse Canvas ~ Donna Salazar Designs

 I am back this month with a Reverse Canvas featuring Donna's Bird cage and Botanique Patterned paper. I was really happy with how this turned out! I have had a very busy couple of weeks trying to get ahead so we can go on a family holiday to New Zealand next week! I am sooo looking forward to the break!
 The mesh around the edge of the frame is like a florist mesh, I stuck it to the edge of the frame then painted over it!.

 I love this little birdie in here! He was just perfect!

The steps for creating this finish on the bird cage is as follows!


Step 1: Paint the bird cage pieces black
Step 2: Once Dry ink over the black with the Pewter Mix'd Media Inx
 Ink Both Pieces.
 Step 3: Sprinkle the Jasmine Mix'd Media Inx Embossing powder over the ink and Heat set.
 Step 4: Sand and distress to give a worn and weatherd look.
 I have used 3D foam tap to attach the two pieces together, slightly bending the front of the cage to give it a curved look. At the center of the base of the bird cage there is several layers of the foam tape.


Materials:
Clearsnap

Spellbinders

Other Products:
Mesh
Bird/ nest & flowers
Chain
Prima vintage trinkets
stick
gesso
Kaiser colour paint - Sea Breeze
Adhesives
Helmar Tiger Grip 
3D Foam Tape!

Tools
Heat Gun
 Thanks for dropping by!
Have a great day!
Cheers
Michelle xx

Thursday, May 31, 2012

Dusty's on Song with New Release!! & Video Tutorial on the Dusty Attic Door

Dusty Attic have another New Release and it is right up my alley! Lots of birds and powerlines and lots of yummy pieces! I have too many faves in this release to mention!
|
More pics of the Kookaburra's at my Inlaws in Cooroy QLD. 


I also have a video tutorial on how I did the door!


Materials:

Dusty Attic
Bamboo #1  - DA0703
Mini Birdhouses - DA0706
Mini Birds #1 - DA0723
Birds Nest #2 - DA0721
Birds on a Wire - DA0708
Door #1 - DA0692
Door Handle Plates - DA0681
Dusty in Bloom - Cornsilk & Grassy Knoll

Other
Modeling paste
White Gesso
Rock Salt
Clearsnap - Smooch Spritz- Green Olive, River Mossy
Clearsnap - Mix'd Media INkx - Truffle, Peridot
Glimmer Glam  - Rustic
Glimmer mist Chalkboard - Sprout
Prima - Resin Shabby Chic Bird house
White Cardstock
Lace
Prima Destressing tool
Kaiser Craft Rub Ons - Bonjour
American Crafts Rubons - Accents book 2


Thanks for dropping by!
Have a great day!
Hugs
Michelle x

Monday, May 28, 2012

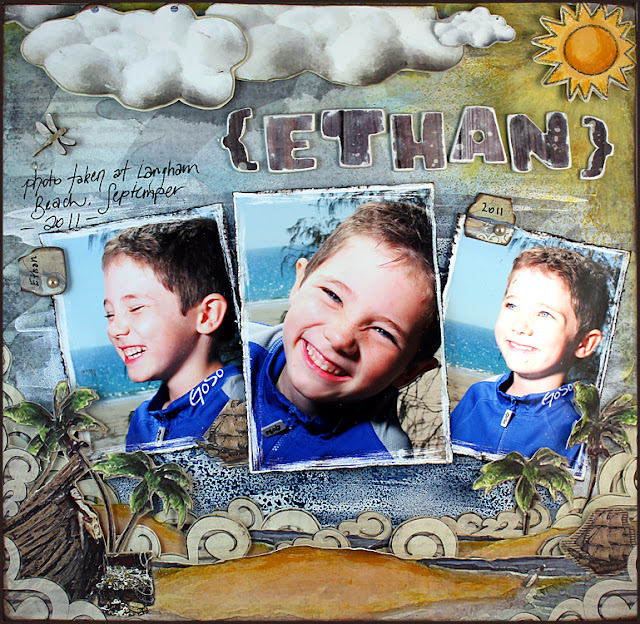
Ethan - DSD Storybook Magic - Video Tutorial - Creative Backgrounds

These story book papers are so cute for kids pages, I have used these photos of my cousin Toni's son Ethan from our last holidays to the beach!
I have also done another Video Tuturial, this time on a creative background technique using Smooch Spritz & Rock Salt. I hope you enjoy this tutorial, and thank you to everyone who watched my first one!


This is what these papers loooked like before::


Enjoy this Video Tutorial on a creative background technique:


Materials:

Clearsnap

GCD Studios
Papers
 

Other Products:
Rock Salt
Gesso
Glossy Accents


Adhesives
Helmar Tiger Grip 
Double sided tape & 3D Foam Tape!
Tools
Craft Knife, Fine tip Scissors
Heat Gun


Thanks again for dropping by and checking out my tutorial!
Have a Great Day!
Hugs
Michelle xxx

Related Posts Plugin for WordPress, Blogger...