Showing posts with label Dusty In Bloom. Show all posts

Friday, March 1, 2013

ATC Give Away Winner Announced!!

Thank you everyone who left a comment to my give away post!!!
I wish I was able to give everyone something!!
OK I got my Hubby Don to draw a comment out of a box and
the lucky Winner of this Prize Pack is...............................

"The Girl Who had A Scrapping Addiction"
Congratulations Sandrine!


Can you please email your address to michellegrantdesigns@gmail.com please and I will get this off to you ASAP!
Thanks again everyone!!!


I hope you enjoy these goodies Sandrine!!! Have a great day!!


Sunday, January 13, 2013

Moulds by Mel ~ Guest Designer Jan 2013

I am excited to share these guest design pieces for Moulds by Mel you can find her Esty Shop HERE. I was lucky enough to see how Mel made these resin pieces in her moulds at the Hyden Retreat. She was so gracious in waiting to show us while everyone was packing up around her! Thank you Mel! All I can say is wow, These are super easy to make and the moulds are perfect for Resin, Wax and Clay. Mel has so many gorgeous designs to work with too! You can make the perfect embellishment every time and customize the colours to suit your projects! And they work so beautifully hand in hand with Dusty Attic chipboard too! Thank you Mel for having me as your Guest Designer, I have really enjoyed creating these.


I have used the Mushroom Moulds on this canvas, they are so cute and whimsical, I have used a white dabber paint over these then inked with a soft beige chalk ink.
I have used a stencil on the background, my new favorite with modelling paste.
Dusty used on this piece is the
deVine Frame Set DA0733
Flutterbies #3 DA0766
mini Birds #3 DA0727
mini Grass Clusters DA0786
Wrought Iron Fence border DA0176

The gorgeous Green Flower is one of Mistra's from a  DSD Spellbinders Die! She is a master at these! I want her to make some more so I can buy them!

What a little treasure it was finding this hidey hole was for photographing my projects, inbetween a couple of sheds on an old rusty frame. I gave Don strict orders not to rip these weeds out or move that frame! LOL


I have made this card using Kaiser Craft papers, I love the colours in this range. I have also used Mels Lady Grace Cameo on this card. What a gorgeous cameo, I love how she turned out!


Lady Grace is a gorgeous cameo with so much charm, you can see the process I used here to transform her and give her some depth.
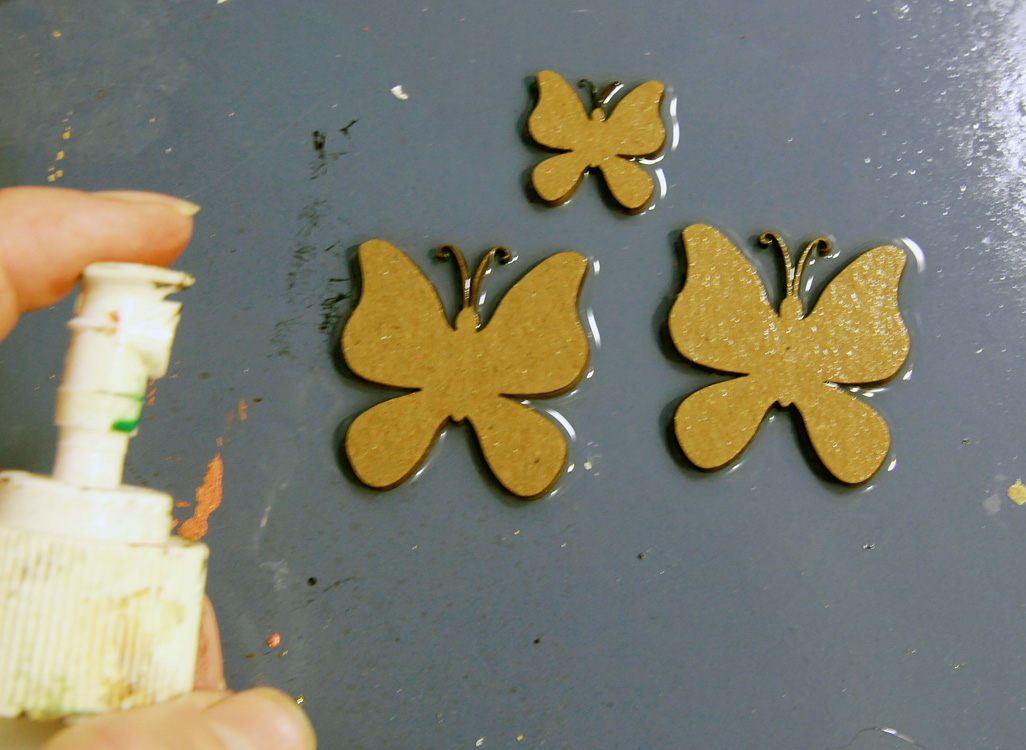
1. Using the Easycast Resin make your cameo using Mels Moulds, Follow the instructions on the packet.
2. I have used Dusty Attic paints and a skin toned paint to paint in Lady Grace. Use a tooth pick to paint in the fine detail on the face.
3. To give her the glossy finish and luxurious depth to the cameo, I have brushed over her with the Biscotti Perfect Pearls dry powder. It just give her a gorgeous sheen and finish.

 I have used the new Dusty Moroccan Border on this card too, I used the Biscotti Perfect Pearls to colour the chipboard mixed with a little water.


I hope you have enjoyed these Projects, and I hope you can get your hands on some Moulds By Mel, the possibilities are endless and is super easy using the resin and great Value for Money! These would be great to use on your scrapbooking, Mixed Media, Card Projects and more, Even Jewellery! Oooh now that gives me an idea!

Thanks for dropping by!!
Have a great Day!
Hugs
Michelle xxx


Friday, January 4, 2013

Freedom ~ Jan ATC & Tutorial ~ Dusty Attic

Welcome to my first Dusty post for 2013. The theme for this months ATC Challenge is Fairies & Flutterbies. These butterflies will soon be available in the next new release.


Flying Chipboard Butterflies - Tutorial

I wanted to create some butterflies with the appearance that they were flying.
This is an easy technique to create movement in your chipboard butterflies.
I have used the new Butterflies #3 that are coming out in the next release.

Step 1: I have used 2 medium and one of the small butterflies.

Step 2: Soak the butterflies in water and separate into 3 layers so 3 butterflies then become 9

Step 3: While the chipboard is still wet curl up the edges of the butterflies, then dry with a heat gun. The heat gun will help the edges curl a little more too.
Step 4: Once dry I have coloured them with Smooch Spritz - Citrus Tickle, then painted the edges of the butterflies with white paint.

Step 5: Use two layers of the butterflies for the medium butterflies. To create the body take a piece of craft wire and add some beads.
Step 6: Then fold the wire around the butterfly going between the antlers and around the back.

Step 7:
To Make the small butterflies I have used each separate layer individually and gently poked the wire through  the middle of the chipboard. Add some PVA glue as you do this to hold it in place.

Materials:

Dusty Attic Chipboard
ATC Chipboard Frame DA0663
Butterflies #3 DA0842

Dusty In Bloom
Mini Roses (Coming Soon)

Other:
Clearsnap - Smooch Spritz - Citrus Tickle, Splash & Ice Rink
Gauze
Wire
Beads


Thanks for Dropping By!
I hope you all have a fabulous year and that all your dreams come true! x

Hugs Michelle xx

Tuesday, August 14, 2012

To Be Yourself - Donna Salazar Designs - DT Swap Mistra

This layout is for Mistra for the Donna Salazar DT Swap. Mistra is collecting quotes and pic's of each DT member. I really struggled scrapping this size, this was the first time I have attempted this size.
I was happy with it in the end! I hope you like it Mis!


Bling:


GCD Studios
Papers
Botanique


Art Gone Wild Stamps
Dear Sir

Other
Dusty Attic Blooms
Kaiser Craft Rub ons
Lace, Ribbon


Thanks for dropping by!
Have a great day!
Cheers
Michelle xx


Thursday, May 31, 2012

Dusty's on Song with New Release!! & Video Tutorial on the Dusty Attic Door

Dusty Attic have another New Release and it is right up my alley! Lots of birds and powerlines and lots of yummy pieces! I have too many faves in this release to mention!
|
More pics of the Kookaburra's at my Inlaws in Cooroy QLD. 


I also have a video tutorial on how I did the door!


Materials:

Dusty Attic
Bamboo #1  - DA0703
Mini Birdhouses - DA0706
Mini Birds #1 - DA0723
Birds Nest #2 - DA0721
Birds on a Wire - DA0708
Door #1 - DA0692
Door Handle Plates - DA0681
Dusty in Bloom - Cornsilk & Grassy Knoll

Other
Modeling paste
White Gesso
Rock Salt
Clearsnap - Smooch Spritz- Green Olive, River Mossy
Clearsnap - Mix'd Media INkx - Truffle, Peridot
Glimmer Glam  - Rustic
Glimmer mist Chalkboard - Sprout
Prima - Resin Shabby Chic Bird house
White Cardstock
Lace
Prima Destressing tool
Kaiser Craft Rub Ons - Bonjour
American Crafts Rubons - Accents book 2


Thanks for dropping by!
Have a great day!
Hugs
Michelle x

Saturday, April 28, 2012

Friends from East Coast to West Coast ~ Dusty Attic ~

 Hi there, I have been having fun playing with some inks, paints, masks and stamps on this layout for Dusty Attic. I was feeling stuck and uninspired so I grabbed my dusty Sketch and stuck the photo down and just went for it. It was so much fun to stick down and layer up. I usually work out where everything is going then stick down. I have used the new release Dusty Attic Compass Rose, Corner Flourish #3 and the new Dusty Blooms.


This was the fun part, payers upon layers of inks, paints and stamps......
  • I started this layout by Sticking down the photo then penciling some lines that I machine stitched over. 
  • I lightly sprayed the top right and bottom left corners with some inks, I have used a mix of Smooch Inx and Glimmer Mist, but I am sorry I can't remember what colours I used.
    I cut a piece of cardstock to cover the photo when I did this step.
  • Next I used Truffle - Mix'd Media Inx  and a crafters template stencil to ink the dots around the photo. 
  • Then taking some Burnished Copper, Pale Gold and Smoked Pearl - Jo Sonja paint I used a plastic card to scrape the paint through the stitched panel going over the stitching. Avoiding the photo.
  • Using Smoked Pearl - Jo Sonja paints I stamped the flourish pattern from the bottom left and top right using my new Donna Downey - Prima foam stamp
  • I finished off this step with spray some more glimmer mist over the top right and bottom left  corners over the stamped flourish.
  • The Chipboard pieces where inked in black then I rubbed some gold Rub & Buff over them before coating them with some crackle accents
 
  • Once I worked out where my clusters were going to go I added black flourish rub ons to the layout.

  • The new Dusty Attic Blooms were perfect for this layout! The colours are so rich and gorgeous.

This was my Dusty Attic Sketch for April that was my inspiration this month.


Materials:

Dusty Attic
Compass Rose - DA0686
Corner Flourish #3 - DA0623

Dusty in Bloom
Smokey Blue - DA0802
Champagne Kisses - DA0801

Mediums
Mix'd Media InksTruffle
Smooch Spritz & Glimmer Mist
Jo Sonja paint - Burnished Copper, Pale Gold and Smoked Pearl
Gold Rub & Buff
Black INk
Ranger -Inkssentials - Crackle Medium
Paper
7 Dots Studio - Dreamer
Other
Prima - Alphas
Basic Grey Rub Ons
Denim Strips
Machine Stitching

Tools:
The Crafters Workshop - Dots All Around
Donna Downey - Prima foam stamp

Adhesives
Helmar Tiger Grip 
Double sided tape & 3D Foam Tape!

Thanks for Dropping By!
Take Care!
Hugs
Michelle x


Related Posts Plugin for WordPress, Blogger...