Showing posts with label Kaisercraft. Show all posts

Sunday, January 13, 2013

Moulds by Mel ~ Guest Designer Jan 2013

I am excited to share these guest design pieces for Moulds by Mel you can find her Esty Shop HERE. I was lucky enough to see how Mel made these resin pieces in her moulds at the Hyden Retreat. She was so gracious in waiting to show us while everyone was packing up around her! Thank you Mel! All I can say is wow, These are super easy to make and the moulds are perfect for Resin, Wax and Clay. Mel has so many gorgeous designs to work with too! You can make the perfect embellishment every time and customize the colours to suit your projects! And they work so beautifully hand in hand with Dusty Attic chipboard too! Thank you Mel for having me as your Guest Designer, I have really enjoyed creating these.


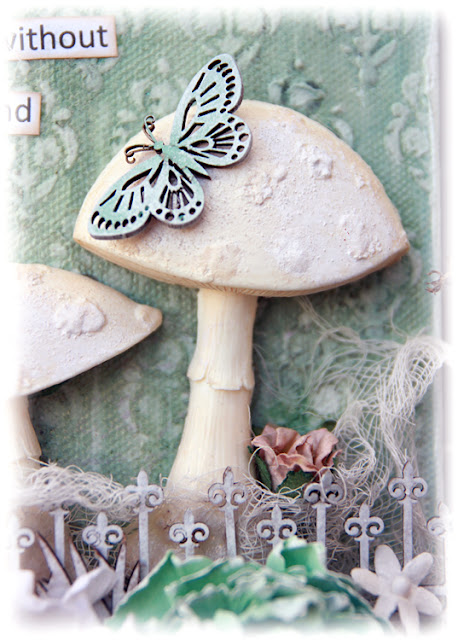
I have used the Mushroom Moulds on this canvas, they are so cute and whimsical, I have used a white dabber paint over these then inked with a soft beige chalk ink.
I have used a stencil on the background, my new favorite with modelling paste.
Dusty used on this piece is the
deVine Frame Set DA0733
Flutterbies #3 DA0766
mini Birds #3 DA0727
mini Grass Clusters DA0786
Wrought Iron Fence border DA0176

The gorgeous Green Flower is one of Mistra's from a  DSD Spellbinders Die! She is a master at these! I want her to make some more so I can buy them!

What a little treasure it was finding this hidey hole was for photographing my projects, inbetween a couple of sheds on an old rusty frame. I gave Don strict orders not to rip these weeds out or move that frame! LOL


I have made this card using Kaiser Craft papers, I love the colours in this range. I have also used Mels Lady Grace Cameo on this card. What a gorgeous cameo, I love how she turned out!


Lady Grace is a gorgeous cameo with so much charm, you can see the process I used here to transform her and give her some depth.
1. Using the Easycast Resin make your cameo using Mels Moulds, Follow the instructions on the packet.
2. I have used Dusty Attic paints and a skin toned paint to paint in Lady Grace. Use a tooth pick to paint in the fine detail on the face.
3. To give her the glossy finish and luxurious depth to the cameo, I have brushed over her with the Biscotti Perfect Pearls dry powder. It just give her a gorgeous sheen and finish.

 I have used the new Dusty Moroccan Border on this card too, I used the Biscotti Perfect Pearls to colour the chipboard mixed with a little water.


I hope you have enjoyed these Projects, and I hope you can get your hands on some Moulds By Mel, the possibilities are endless and is super easy using the resin and great Value for Money! These would be great to use on your scrapbooking, Mixed Media, Card Projects and more, Even Jewellery! Oooh now that gives me an idea!

Thanks for dropping by!!
Have a great Day!
Hugs
Michelle xxx


Wednesday, December 5, 2012

Washes the Soul ~Canvas~ Dusty Attic

Howdy, I hope this post finds you well and not melted all over the floor! Man it is sooo hot here! Its nice in the aircon now though!
I have given myself the day off today, I have been learning and researching and working on my Businesses & Design team work nearly non stop for weeks! Its been hard though, my mind is thinking I should be doing this and that and this and so on!
Anyway I had an invite to go to lunch and the movies today, so throwing caution to the wind of what needs doing around here I went and have given myself the whole day off from any work. We had a lovely day, we saw Les Miserables. It was a good movie and very well done! The acting and singing was brilliant. But it is not an uplifting movie, so much pain and suffering. It was quite long too!! I saw the Les Mis stage show close to 18 years ago, but couldn't remember the story line so I was trying to work out what parts of the movie I recognized from the stage show. Was so long ago, a few scenes and songs were familiar. I enjoyed it all the same!
Was a fabulous day out with friends too!!!
So now I am home, Oh and I know I said I wasn't doing any work today but this post was already half done so I just wanted to write about having a day off, and now I plan to play for the rest of the night, Wil has gone to a party and Don is at work so will be nice and quiet!
Now... what will I do?? A canvas or a layout! Mmmmm...

I will leave you with this canvas I did for a friend awhile ago! x


I created this reverse canvas for my friend Renee awhile ago.
I love this quote!


Materials:
Mod Podge, Gesso, Impasto
Adirondack Dabber Paints - Red Pepper, Snow Cap
Jo Sonja Paints - Colony Blue, Napthol Crimson
Perfect Pearl Mists - Pewter
Paper - Kaisercrafts
Petaloo - Flower
Bird - A touch of nature
Gauze.

Dusty Attic
Chain Fence DA0450
Scroll #6 small DA0579
Chandelier small 2 pk
DA0080


Thanks for dropping by!
Have a great day!
Hugs
Michelle x

Sunday, November 25, 2012

Posers ~ Donna Salazar & Dusty Attic

Hi I am back again, today I am sharing this layout that I created at the Hyden Retreat in WA.
I think I was channeling my friend Debbie in the picture here as this layout reminds me of her style too. We had a table challenge at the retreat to use the dusty decorative frame #1.
I was also spoilt by Mistra who gave me a bunch of her ready made Donna Salazar Flowers made from the rose creation die! They are just sooo yummy, she is such a clever chickie!
The Sprightly Sprockets white coordinates fit perfectly over the decorative frame. I have also used the Family Portrait - Botanique paper here.
 The circle design was created with an Orchid (The Crafters Workshop) Template. The center was inked with the Black Mix'd Media Inx. The blue Sea Kiss Smooch Spritz was wiped on with a baby wipe then I have used a card to wipe a thin layer of modelling paste over this to soften the whole effect. The blue dots around the border were created by sewing french knots on each dot.


Materials:

Clearsnap
Spellbinders - Rose Creations

Other Products:
Embroidery Thread
Modelling Paste

Prima Bling
Basic Grey Alphas
Kaisercraft Rub Ons

Cardstock
Martha Stewart Punches
Doilies
The Crafters Workshop Template - Orchid


Dusty Attic

Decorative Frame #1 - DA0207


Adhesives
Helmar Tiger Grip 
Double Sided Tape


Thanks for dropping by!
Have a great day!
Cheers
Michelle xx

Tuesday, August 14, 2012

To Be Yourself - Donna Salazar Designs - DT Swap Mistra

This layout is for Mistra for the Donna Salazar DT Swap. Mistra is collecting quotes and pic's of each DT member. I really struggled scrapping this size, this was the first time I have attempted this size.
I was happy with it in the end! I hope you like it Mis!


Bling:


GCD Studios
Papers
Botanique


Art Gone Wild Stamps
Dear Sir

Other
Dusty Attic Blooms
Kaiser Craft Rub ons
Lace, Ribbon


Thanks for dropping by!
Have a great day!
Cheers
Michelle xx


Monday, August 6, 2012

Knowing Yourself - Canvas - Dusty Attic

This is a quick canvas I started awhile ago using the Wire Dress Form from the Jan/Mar release.


I think I have used the Vintage and Leather Mix'd Media Inks on the dress form then embossed with clear embossing powder.


Materials:

Dusty Attic

Other
5x9 Canvas
Kaisercraft papers
Mix'd Media Inx
Magazines/ book paper
Beads & Lace
Paints
Water Colour Pencils


Thanks for dropping by!
Have a great day!
Hugs
Michelle x

Tuesday, March 13, 2012

Dusty DT 2011 *Dusty Attic*

Jen Challenged the 2011 Dusty Attic Design Team to scrap a layout of the 2011 team pics,
This has been an ongoing project as it kept getting interrupted with other deadlines.
I Finally got it finished and now have finally got it uploaded. 
I have been so blessed to be a part of Dusty Attic! They just add that finishing touch to every layout!
This really is an amazing team, the support and inspiration each person brings to the team is outstanding! Thank you girls from the bottom of my heart!


I have showcased the gorgeous Lacing Tash pieces on this double layout.
It has been awhile since I have done a double layout, so it was fun to play with this one!


To do the Lacing Tash pieces I first painted them with the cranberry dabber, then sprayed them with the glimmer mists and then finished off with the biscotti perfect pearls mist! (This is fast becoming a favourite! I am onto my second bottle already!) Once this was dry I machine stitched the insides of the dusty pieces with a zig zag stitch.


After the stitching was finished I taped the two pieces to a narrow strip of patterned paper then punched the holes through to the back then set the eyelets. These eyelets are that old my grandma gave them to me years ago, I love the distressed look of the paint chipping off them.


The other chip pieces in this layout were just sprayed with the biscotti mist.


First use a scrap of paper or something to cover the body. Then the wings of the diva were lightly painted with the dapper paint and sprayed with the glimmer mists. While the wings were still damp I used a craft knife to gently lift up the tips of the wings. She was then sprayed all over with the Biscotti Mist.


Dusty Attic:
Lacing Tash - DA0631
Divine Divas - DADA0657
Corner Flourish #
2 - DA0629Fish Net Panel - DA0654
Mini Wire Dress Form -
DA0670
Typewriter ABC Set -
DA0143
Fancy Trim #4 -
DA0470

Paper:
Pink Paislee - Butterfly Garden Collection
Cardstock


Embellishments:
Prima Flowers - Bretton Vines Purity
Prima Say it in Cyrstals - SIIC Borders sparkling
Maya Road Flowers - Ruffle Blossoms
Kaisercraft -
Pearls
Lace, String, Eyelets.
Machine Stitching

Mediums:
Glimmer Mist - Deep Plum
Glimmer Mist Chalkboard - Grape Ape
Perfect Pearls Mists - Biscotti
Adirondack - Cranberry

Thanks for dropping by!!!
Have a great Day!
Cheers :)
Michelle x


Monday, February 27, 2012

CSI #8 - Laugh Kookaburra Laugh + *Tutorial-Textured Chicken Wire*

Hi there again, I hope this post finds you all well! Things have been quiet busy around here, and the next few months are going to be even busier! I am getting excited with the things I have in the works! Hopefully all will be revealed very soon!

I had a break in deadlines over the weekend, so I got to have another play with CSI Case File #8.
These are so my colours, so how could I not!
This layout is of one of the Kookaburra's that visit my hubbies parents place in Cooroy QLD. His dad feeds them, he has quite a few dropping in most days!  It is nice to sit there and listen to them laugh and squabble amongst each other. I got sooo many pics of them. It was a great opportunity to get up close and personal with them and play with my new camera.
 

Materials:

Dusty Attic -  Chicken Wire Panel DA0177
Dusty Attic - Fountains 3pk (New Release)

Papers:
7 Dot Studio - Dreamer - Nights Fever, Drive all Night

Embellishments:
Prima - Sugar Plum Roses Carribean, Sculpture Flowers, Decorative Border, Hex Net Stamp
Pink Paislee - Sweetness Metal Badges, Sweetness Glitter Sticker Alphabet

Mediums:
Donna Salazar - Mix'd Media Inx - Peridot
Monte Marte - Impasto
Ranger - Glossy Accents
Kaisercolour paint - Coastal Blue
Alison Ellis Design - Glitter Blue Ice
Stazon - Timber Brown
Tattered Angels Glimmer Mist - Chalkboard - Peacock & Firefly
Neocolour crayon - Golden Ochre
 
Tutorial: Textured Chicken Wire 
This is a quick and easy way to create texture on your background.
Materials : Impasto or Texture Paste, Paint (Coastal Blue Kaisercolour), Spatula,
Dusty Attic Chicken Wire. Spray inks / Glimmer mists to finish off
(I have used - Chalkboard - Peacock & Firefly)

Step 1: Mix a little paint in with your texture paste then wipe it over your chicken
wire hit and miss in some places and more solid in others.
If you have an idea where your photo is going you don't need to do the whole background.
Step 2: Lift the chicken wire and move to repeat. The dark lines you can see in the
texture paste is the residue from the cut chipboard. As the texture paste is a wet
medium, turn it around to use a different section of the chicken wire as it will
start absorbing the moisture.
 Step 3: Once you are happy with the placement of your texture paste leave to dry.
You can lift your page and dry with a heatgun from the back or leave to dry
naturally. When it is almost semi dry I place a plastic bag over it and pop it
under my cutting mat to help flatten the page.
 Step 4: To finish off spray glimmer mist over the page to add another
dimension. Then you are done! Easy.

You can get a PDF Printout of this tutorial HERE at Dusty Attic 

 Thanks for dropping by!
I hope you have enjoyed this Tutorial!
Have a great Day!
Hugs
Michelle x
Related Posts Plugin for WordPress, Blogger...