Sunday, April 29, 2012

My Girl - DSD - My fist Video Tutorial - Handmade Flowers with Lace.

Hi there, so lovely to see you here again! Today I have another Donna Salazar Creation to share with you. Using the Beautiful Botanique Paper Range and the Want2Scrap - Build your own Bling.
I have also created my very first online video tutorial. It has been a huge learning curve for me and very nerve wracking. I think I sound dreadful on camera but anyway it is done! I am a little excited that it is done now too! The Video Tutorial is on making your own handmade flowers with the Mix'd Media Stax papers and Lace, with a little smooch and fairy dust thrown in for good measure.
I will also be sharing a tip here on colouring bling to suit your projects.

Here is the layout I have created for this project. This is an old photo of my gorgeous daughter Leonii and myself taken a few years ago. There is lots of fussy cutting on this layout too.

When I am fussy cutting for clusters, I cut out whole pieces and then cut them down to smaller  pieces when needed. Helps to manipulate your fussy cut pieces to fit perfectly into the available spaces.


Coloured Bling Tutorial
 The bling on this layout started out as the clear silver bling. I have coloured them using the Smooch Spritz Sprays. Although these are not permanant inks I found that it held the colour enough for what I wanted here. You can also use Alcohol inks for a more permanent finish.

Step 1: Grab your clear bling, a smooch spritz spray,
I have used the Candle Glow Smooch here and an ink aplicator.
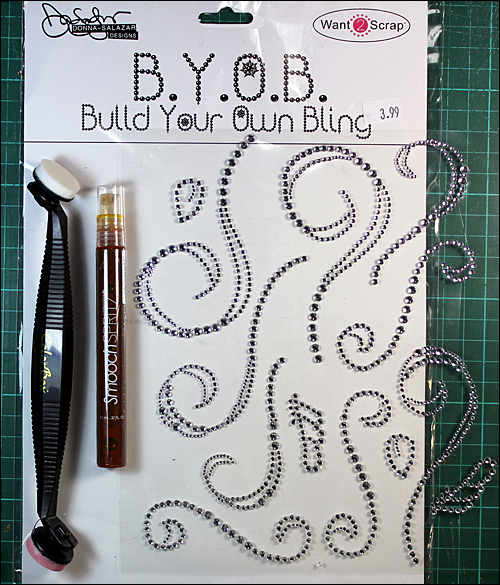
 Step 2: Spay a little of the smooch spritz on a piece of plastic or a craft sheet.
I have used the packet the bling come in here.
Then Load your ink applicator with the ink.
 Step 3: Then simply dab the ink over the bling.
Leave to set for a minute or two then dab off the excess with a paper Towel.


Now here is my first video tutorial! Thanks for watching!


Materials:
Clearsnap

GCD Studios
Papers


Other Products:
Lace
Decorative Brads
Basic Grey Alphabet - Hopscotch Micro Mini


Adhesives
Helmar Tiger Grip 
Double sided tape & 3D Foam Tape!

Tools
Craft Knife, Fine tip Scissors
Heat Gun
Needle & Thread (Handstitching)
Fiskers Border Punch

 
Thanks again for dropping by and checking out my tutorial!
Have a Great Day!
Hugs
Michelle xxx

Scraproom Storage - How I store my Dusty Attic Chipboard

This is just a quick tip on how I store my Dusty Attic Chipboard.
This is still a work in progress, I just got a new label maker so I still have to label all my files properly. I store my Dusty in A4 Keji Carry Files. They are a perfect size for most of my Dusty.
I store the 12x12 size Dusty Pieces in a 12x12 Work in Progress Display Folder.
I picked the Keji Carry Files up from Officeworks in Mackay QLD. I can't remember how much they were. I think they were around the $5.00 mark, but don't quote me on it!
They are 265mm(W) x 345mm(L) x 42mm(deep) and holds so much dusty. It works just as good for the pieces without packaging too.
I would love a clip it up but just don't have the space in my current Studio/Office.


As you can see they hold quite a bit of Dusty Chipboard.....


Labelling is the most important part of any Storage System.
I am in the process of organising my dusty into the categories that are on the Web Site. You can find the list of Categories here:
http://thedustyat.cart.net.au/

I have a couple of categories in some of the files, so I have added the category names to the spines of the files, then I have listed the items in that category on the front of the folder. It helps to find what you are looking for quickly.
The best part of this storage system is that it is portable too, easy to grab if you are off to a crop.
I store these at the top of my Shelves in the top right hand corner of this photo, they are quick and easy to grab from here.

I hope this tip has given you another idea on storing your Dusty Chippies!

TFL
Have a great Day!
Hugs
Michelle x

Puppy Love ~ Dusty Attic

 Hi Again, I am playing catchup at the moment on uploading layouts that I did a while ago. Here is one on my gorgeous Niece Gracie. Lots of Dusty Goodness on this layout, I probably went a bit over board LOL!
I can't really remember how I achieved the finish on these pieces, mainly paint and glimmer mists.


Materials:

Dusty Attic
 Toadstools  - DA0565
Fancy Trim #6 - DA0588
Watering Can - DA0403
Mini Fairies - DA0562
Picket fence Border - DA0175
Twig - DA0129
Leafy Frame Set - DA0605
Song birds - DA0483

Other
Adirondack Dabber Paints -  Snow Cap, Espresso
Perfect Pearls - Pearl, Pewter
Smooch - Frosted Aqua, Cape Cod, Pumpkin
StazeOn - Timber Brown, Distress Ink - Walnut stain
Papers - Sassafras- Mix & Mend
Distress Stickles -Broken China
Paper - Time Holtz - Craft Glassine Paper
Prima - Resin Shabby Chic Bird house
Orange Cardstock
Basic Grey Basic Letters-Micro mono 
Gauze, Pearl Brads, Lace

Thanks for dropping by!
Have a great day!
Hugs
Michelle x


Saturday, April 28, 2012

Friends from East Coast to West Coast ~ Dusty Attic ~

 Hi there, I have been having fun playing with some inks, paints, masks and stamps on this layout for Dusty Attic. I was feeling stuck and uninspired so I grabbed my dusty Sketch and stuck the photo down and just went for it. It was so much fun to stick down and layer up. I usually work out where everything is going then stick down. I have used the new release Dusty Attic Compass Rose, Corner Flourish #3 and the new Dusty Blooms.


This was the fun part, payers upon layers of inks, paints and stamps......
  • I started this layout by Sticking down the photo then penciling some lines that I machine stitched over. 
  • I lightly sprayed the top right and bottom left corners with some inks, I have used a mix of Smooch Inx and Glimmer Mist, but I am sorry I can't remember what colours I used.
    I cut a piece of cardstock to cover the photo when I did this step.
  • Next I used Truffle - Mix'd Media Inx  and a crafters template stencil to ink the dots around the photo. 
  • Then taking some Burnished Copper, Pale Gold and Smoked Pearl - Jo Sonja paint I used a plastic card to scrape the paint through the stitched panel going over the stitching. Avoiding the photo.
  • Using Smoked Pearl - Jo Sonja paints I stamped the flourish pattern from the bottom left and top right using my new Donna Downey - Prima foam stamp
  • I finished off this step with spray some more glimmer mist over the top right and bottom left  corners over the stamped flourish.
  • The Chipboard pieces where inked in black then I rubbed some gold Rub & Buff over them before coating them with some crackle accents
 
  • Once I worked out where my clusters were going to go I added black flourish rub ons to the layout.

  • The new Dusty Attic Blooms were perfect for this layout! The colours are so rich and gorgeous.

This was my Dusty Attic Sketch for April that was my inspiration this month.


Materials:

Dusty Attic
Compass Rose - DA0686
Corner Flourish #3 - DA0623

Dusty in Bloom
Smokey Blue - DA0802
Champagne Kisses - DA0801

Mediums
Mix'd Media InksTruffle
Smooch Spritz & Glimmer Mist
Jo Sonja paint - Burnished Copper, Pale Gold and Smoked Pearl
Gold Rub & Buff
Black INk
Ranger -Inkssentials - Crackle Medium
Paper
7 Dots Studio - Dreamer
Other
Prima - Alphas
Basic Grey Rub Ons
Denim Strips
Machine Stitching

Tools:
The Crafters Workshop - Dots All Around
Donna Downey - Prima foam stamp

Adhesives
Helmar Tiger Grip 
Double sided tape & 3D Foam Tape!

Thanks for Dropping By!
Take Care!
Hugs
Michelle x


Sunday, April 15, 2012

King of the Bush - DSD - Spring in Bloom & Artistic

Hello there! Today we are back with Donna Salazar, featuring the GCD Spring in Bloom Paper collection and Artistic Papers.

My father in law feeds these gorgeous birds, he has a family of them drop in for a feed.
The background on this layout was first inked with the Truffle Mix'd Media Inx then using a brayer layer some of the aqua paint working from the center of the page out. Then using a straw, suck up a bit of yellow paint then blow it out over the page.
Materials:
Clearsnap

Spellbinders
GCD Studios

Other Products:
Matisse - Aqua Green Light paint
Jo Sonja's - Cadmium yellow light paint

Adhesives - Helmar Tiger Grip  Double sided tape & 3D Foam Tape!
Prima Distressing Tool
Heat Gun.

And I also have a bonus Wedding Card, that I made for a good friend of mine!


Thanks for dropping by! I hope that you will be able to find some inspiration from these!
Have a great day!
Cheers
Michelle x
Related Posts Plugin for WordPress, Blogger...